

Control a Raspberry Pi with your voice
Application to trigger actions on the RPi
The web application is created using the Python framework named Flask.
We start by installing the framework on our Rpi.
|
1
2
|
sudo apt–get install pip
sudo pip install flask
|
We create a python file that we make executable
|
1
2
|
touch controle_volets.py
chmox +x controle_volets.py
|
Here is the code used. I have defined 2 resources: opening and closing.
|
1
2
3
4
5
6
7
8
9
10
11
12
13
14
15
16
17
18
19
20
21
22
23
24
25
26
27
28
29
30
31
32
33
34
35
36
37
38
39
40
|
#! /usr/bin/python
# -*- coding:utf-8 -*-
from flask import Flask, request
from gpio_control import GpioControl
app = Flask(__name__)
@app.route(‘/’)
def index():
return « App de control des volets »
@app.route(‘/ouverture’, methods=[‘POST’])
def ouverture():
if request.method == ‘POST’:
if request.values[‘password’] == « monpass »:
# lancez ici le script que vous voulez
print « ouverture volet »
gpio_ouverture = GpioControl()
gpio_ouverture.ouverture()
else:
print « mauvais pass »
return « Ouverture des volets »
@app.route(‘/fermeture’, methods=[‘POST’])
def fermeture():
if request.method == ‘POST’:
if request.values[‘password’] == « monpass »:
print « Fermeture des volets »
gpio_fermeture = GpioControl()
gpio_fermeture.fermeture()
else:
print « mauvais pass »
return « Fermeture des volets »
if __name__ == ‘__main__’:
app.run(debug=True, host=‘0.0.0.0’)
|
In the example I am using the “GpioControl” class that I am giving you as an example. This places the GPIO ports in a “1” state for one second. Obviously, this script is specific to the control of my roller shutters. You must replace yours as part of the home automation control you are developing.
|
1
2
3
4
5
6
7
8
9
10
11
12
13
14
15
16
17
18
19
20
21
22
23
24
25
26
27
28
29
30
31
32
33
34
35
36
37
38
39
40
41
42
|
import time
import RPi.GPIO as gpio
class GpioControl:
def __init__(self):
pass
def ouverture(self):
# on passe en mode BMC qui veut dire que nous allons utiliser directement
# le numero GPIO plutot que la position physique sur la carte
gpio.setmode(gpio.BCM)
# defini le port GPIO 4 comme etant une sortie output
gpio.setup(4, gpio.OUT)
# Mise a 1 une seconde puis 0 une seconde
gpio.output(4, gpio.HIGH)
time.sleep(1)
gpio.output(4, gpio.LOW)
gpio.cleanup()
def fermeture(self):
# on passe en mode BMC qui veut dire que nous allons utiliser directement
# le numero GPIO plutot que la position physique sur la carte
gpio.setmode(gpio.BCM)
# defini le port GPIO 4 comme etant une sortie output
gpio.setup(22, gpio.OUT)
# Mise a 1 une seconde puis 0 une seconde
gpio.output(22, gpio.HIGH)
time.sleep(1)
gpio.output(22, gpio.LOW)
gpio.cleanup()
|
Start the Flask Web server (I run in sudo because the GPIO library requires root rights)
|
1
|
sudo ./controle_volets.py
|
We will test the resource. On Linux I test using the Curl tool. The syntax is as follows
|
1
|
curl <url> –d <data> –X type de requete
|
To test the “closure” resource, I type
|
1
|
curl http://192.168.0.20/fermeture –d « password=monpass » –X POST
|
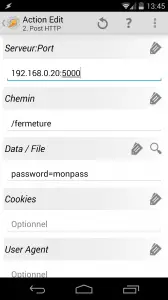
Creating the Tasker action
I'm assuming you've already created an event and recorded the voice command. We will now create the action associated with this event.
The action will consist in sending the HTTP POST request to the Flask server on the Rpi.
- In the task menu previously opened following the creation of an event, enter a name for your task.
- Click on “+” to add a new action
- We go to the “Network” category, then “Post HTTP”
- In “Server: Port” we give the IP address of the Rpi as well as the port of the Web server. In my case 5000, the default port of Flask
- In “path”, enter the URL of the requested resource. In my example / closure
- In “Data / file” I place my data sent in the POST, namely a password. password = ”mypass”
Voila, all you have to do is call the order via Google Now. This is what it gives me.